3 D S C A N N I N G A N D P R I N T I N G
ROBIN AND A BEARING
The assignment was to 3D scan something an to 3D print something simple.
THE PROCESS:
1-Design something
2-Make an .STL file
3-Send it to the 3D printer
1-Scan something
2-Edit it for presentation
I had used the 3D printer previously but had never made moving parts in it, so I decided to continue the jewelry experiment to test the limits of the tools and decided to make a bearing ring based on the existing model of a large bearing at the CBA shop. Since the first prototypes I make are always intended to fit me, this was definitely going to test how small the printer can go.

I designed the bearing using known acceptable tolerances of the machine, where the bearing balls are 1/16" in diameter and the distance between them and the interior of the bearing is .015" The ring size is 5.

The first ring (on the left) initially seemed to not work, but on closer inspection (and poking through the wax support material) I realized that not only was it working but actually slightly loose. So, I decided to try the same bearing with an even smaller interior tolerance of .007 (the model on the right.)

Since the first ring initially looked as if it would not work, Tom from the CBA shop scaled up the model in hopes of helping me produce a working project for the week. We both learned ball bearing do not scale up and the result "lost all of its marbles" as soon as the wax material was melted away.

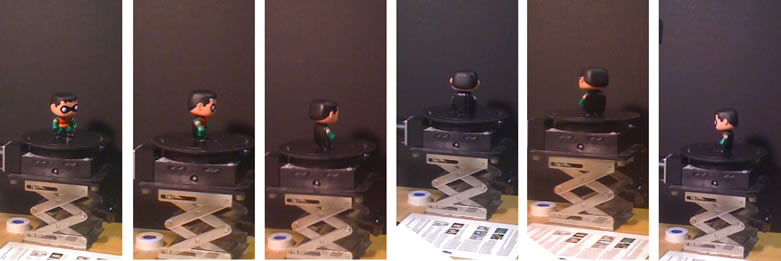
3D SCANNING

The 3D scanning was created using the Minolta scanner at the CBA shop with the Geo Magic interface. Once the scanner was focused and centered on Robin, we were ready to spin him around!

The Minolta 3D scanner works by taking the position of the object it is scanning with a laser. The object sits on a turntable that is told how often to spin, most usually at 45 or 90 degrees. Since Robin is somewhat complex, I set him up to spin every 45 degrees.
After scanning Robin, I exported the model as a .STL in order to open it in Rhino. The Geo Magic software was very good editor to close most holes and make the model more accurate to the original. Once the model was imported into Rhino, it was clear how difficult it would be to edit the model within Rhino. This is a 'rendered' view of the model, where it is clear how dense the mesh is. Something to be aware of is that the model came into Rhino sideways.


Lessons Learned
The Dimension Polyjet 3D Printer is really an amazing machine. It is capable of very high resolution and small details. It is also one of the best tools to prototype moving parts. The ABS plastic dimension 3D printer prints at a lower resolution and it has a much higher tolerance threshold, it is not very good to print something very small like the bearing.
Don't play with your weekly project before photographing it!!